When an end mill is finished: the four marks that decide regrind or retire
A cutter rarely fails without warning. It leaves a band, a chip, a lump or a mark on the wall, and each of those points at a different culprit. The runout check rules out the holder; this page is about the tool itself.
Tool life is a rate, not a number
Every record in this category lists a diameter, a flute count or a coating, and none of them lists how long the tool will last. That is not an omission. Life depends on the material, the width of cut, the rigidity of the setup and the coolant, so a single number would be wrong more often than right. What can be compared is the rate at which the edge wears on your machine, in your fixture, on your material.
That rate is read from four marks. Three are on the tool: a band on the flank, a chip at the edge, a lump welded across it. The fourth is on the workpiece: a taper, or a set of evenly spaced marks on the wall. They look alike in a tool crib and they have four different fixes.
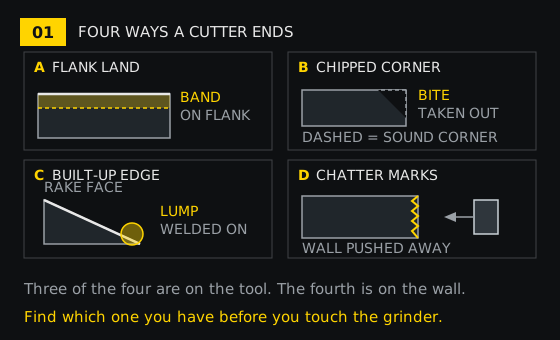
The order below runs from the mark that is cheapest to read to the one that costs the most to fix.
The flank land: a band you can measure
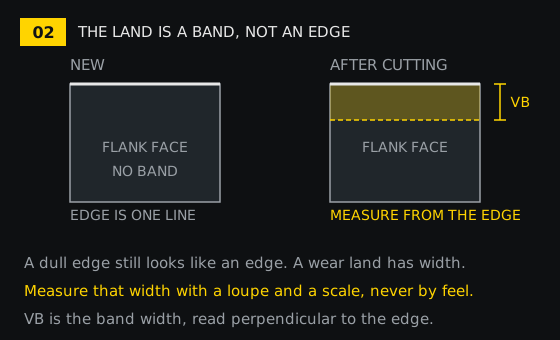
Flank wear starts at the corner and runs back along the cutting edge as a bright, matte band on the face that rubs the workpiece. On a coated tool the band is where the coating has gone. It is not a chip and it is not simply a dull edge: it has a width, and the width can be read with a loupe and a scale.
Light matters more than magnification. Hold the tool so the light rakes across the flank instead of shining straight at it. A band that is invisible in direct light shows as a change of texture at a low angle. Read across the band, perpendicular to the edge, not along it.
What the reading means is a comparison, not an absolute. A band of the same width as last month, on the same job, means the tool is stable. A band that has doubled since the last check, on the same job, means something in the process changed: a harder batch, a deeper cut, less coolant, or a holder that is no longer holding.
Read three points on the same edge
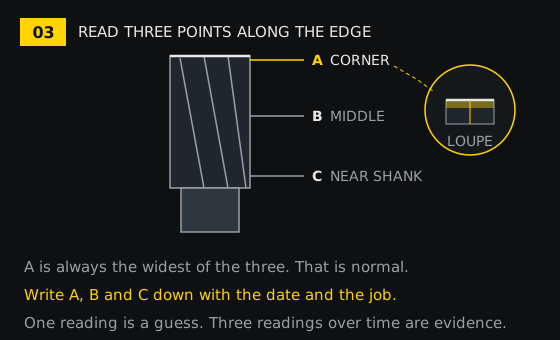
- A, at the corner. This is the widest point on a healthy tool and the first place a failure starts.
- B, halfway along the flute.
- C, at the end of the flute nearest the shank.
- Write all three, with the date, the material and the depth of cut.
A corner wider than the middle is normal. A middle wider than both ends is not: it means the tool was rubbing at one depth, usually because the wall was springing back onto it, or because a previous pass left stock where the tool expected none. A band that is wide at C and narrow at A is unusual, and usually means the tool was used for a shallow cut after being ground, so only the upper part of the flute did any work.
Three numbers taken once are a snapshot. Three numbers taken after each job are a trend, and the trend decides whether you change the process or the tool.
Chipping: size and position decide
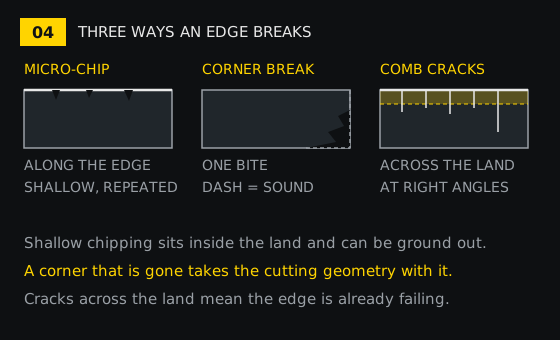
Micro-chipping runs along the edge as a row of small bites, each one a fraction of the band width. It appears when the edge is loaded intermittently: an interrupted cut, a fixture that moves, a tool that is too long for the depth, or a material with hard inclusions. It is the least serious of the three, because the bites sit inside the wear land and a regrind removes them together with the land.
A corner break is one bite, much larger, at the point where the edge meets the end face. It usually comes from entry: a plunge, a ramp, a clamp that was not tight, or a hard skin on a casting. The corner does the first work and takes the first load, so a small error in the setup arrives there as a large force.
Comb cracks run across the band at right angles to the edge, evenly spaced, like the teeth of a comb. They come from thermal cycling: a hot edge meeting coolant, or a dry cut cooled unevenly by an air blast. They are the most serious, because they run into the substrate, and grinding the edge back does not remove a crack that has already turned inward.
- Micro-chips inside the band. Regrind, then look for the intermittent load that caused them.
- One corner broken. Measure the length it took. If the corner radius is gone, the tool is now a different cutter, whatever the diameter says.
- Cracks across the band. Retire the tool, whatever the band width says.
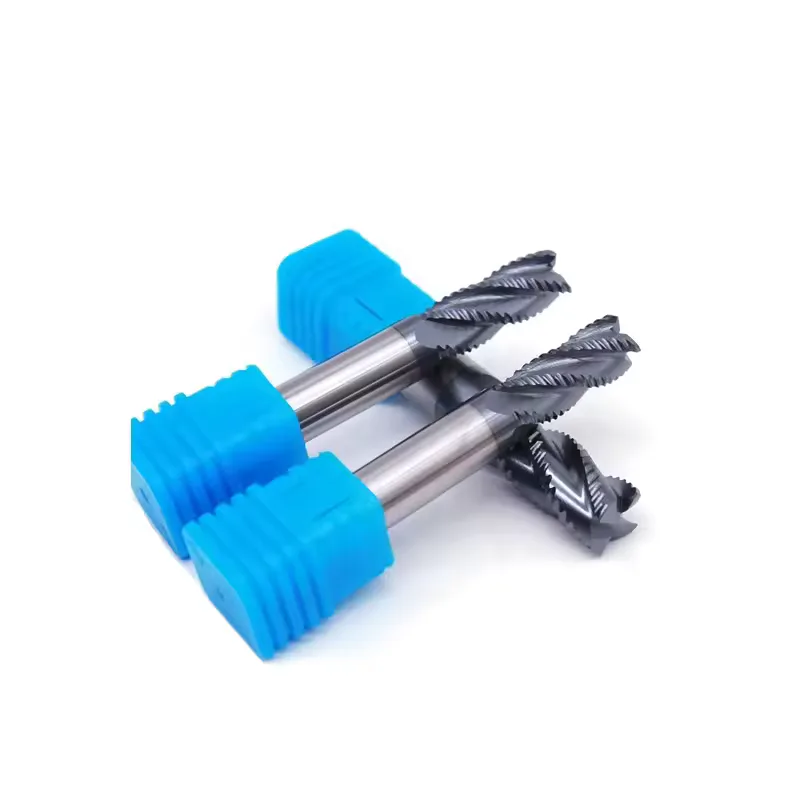
Built-up edge: the workpiece on the tool
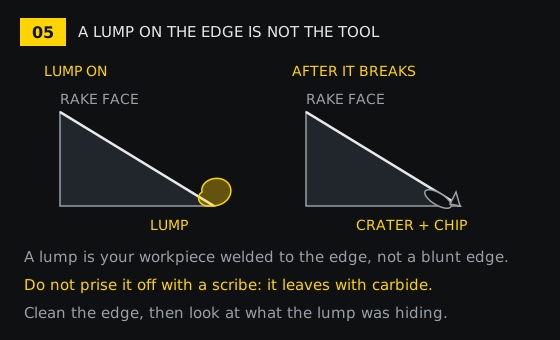
A built-up edge is workpiece material welded to the rake face and across the edge. It looks like a dull lump, grey or blue, standing proud of the cutting edge, and while it is there it changes the geometry of the cut. The finish it leaves is smeared rather than torn, and the lump grows and breaks away in a cycle, so the finish changes from pass to pass.
It appears where pressure and temperature are high enough to weld: soft steels, aluminium, copper, and any material that galls. The coating matters less here than the edge finish and the speed. A polished flute with no coating is often the better choice for aluminium, and the records in this category include exactly that: single-flute uncoated cutters listed for aluminium work.
Do not pry a lump off with a carbide scribe. The lump is welded to the edge, and when it comes away it takes a piece of the edge with it, turning a cleaning job into a chipping job. Brush along the rake face with a soft brass brush, and then look at the edge underneath: a crater or a chip that was hidden by the lump is the real condition of the tool.
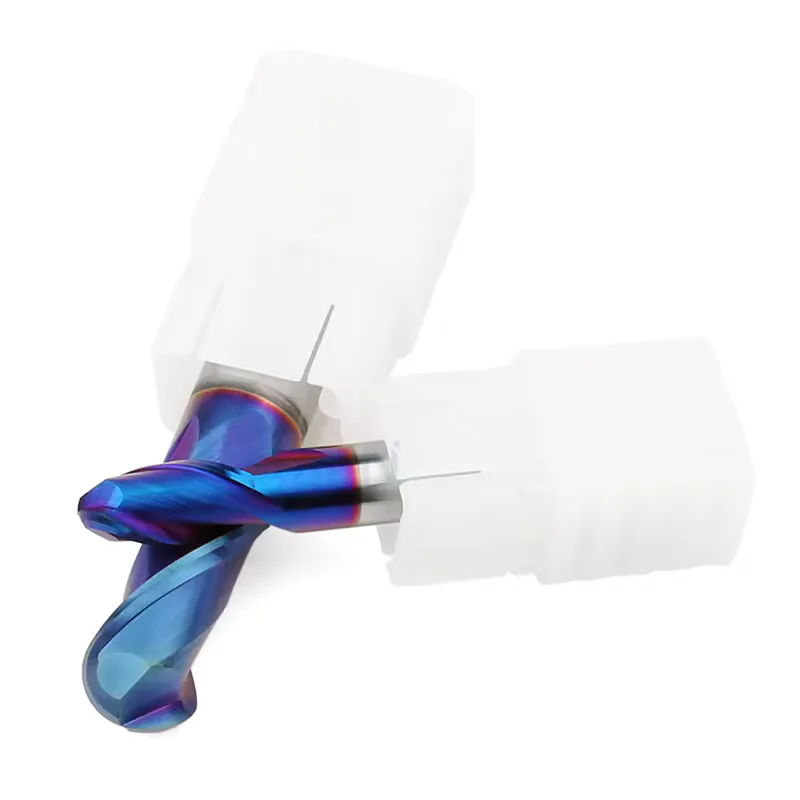
Taper and chatter: marks that may not be the tool
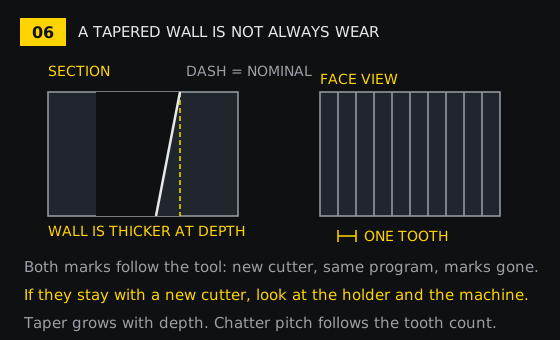
A wall that is thicker at the bottom than at the top is the signature of a tool pushed away from the cut. The deflection grows with depth, so the error grows with depth, and the wall ends up tapered in a way the program never asked for. Chatter looks different: evenly spaced marks across the face, at a pitch that matches the number of teeth passing per revolution.
Neither is proof of a worn tool. A sharp tool deflects too, and a new tool can chatter in a weak setup. The test that separates them is cheap: put a new cutter in the same holder, run the same program, and cut the same wall.
- Marks gone with the new cutter. The old tool was blunt, and the extra force came from the wear land.
- Marks still there. The tool was not the cause. Check runout first, then the fixture, then the machine.
That test is also the reason to keep one unused cutter of each type in the crib. It is the only way to answer the question without arguing about it.
If the marks survive a new cutter, the runout check covers the holder and the accuracy check order covers the machine. A worn guideway will produce a taper that no tool change fixes, and relining the guideways is the job that follows that finding.
One flute worn more than the others
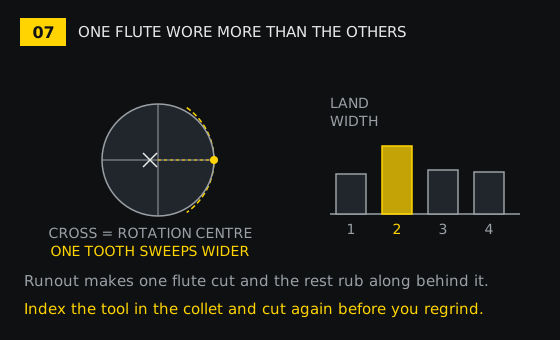
When the band is wide on one flute and narrow on the rest, the tool is not wearing evenly, and the cause is usually outside the tool. Runout puts the axis of the cutter off the axis of the spindle, so one tooth sweeps a larger circle, takes a bigger chip and wears first. The other teeth rub instead of cut, which polishes them and dulls them without producing a band.
The test is an index. Mark the flute with the widest band, loosen the collet, turn the tool through half a turn, tighten and cut the same feature.
- The wide band moves with the collet position. The holder is the cause. Check the collet for chips and wear, the nut for torque, and the shank for a burr.
- The wide band stays with the same flute. The tool is bent, or was ground unevenly. Retire it: a regrind will copy the error rather than remove it.
A worn collet makes a good tool look bad, and a badly ground tool makes a good collet look bad. The index test separates them in one cut.
What changes when the tool gets shorter
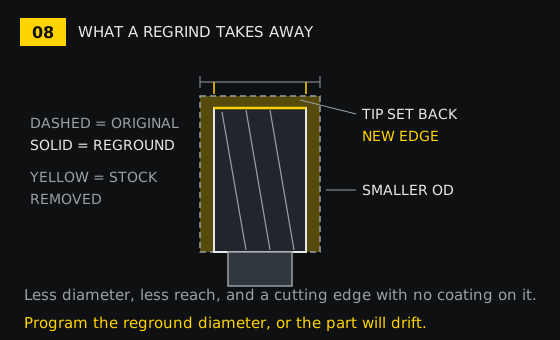
A regrind removes material from the outside diameter and from the end, so the tool that comes back is not the tool that went out. Four things change, and each one has a consequence at the machine.
The diameter
Cutting speed is proportional to diameter times rpm. A smaller diameter at the same rpm cuts slower, so to keep the surface speed the tool was designed for, the rpm has to rise in proportion to the diameter that was lost. Where a shop runs a fixed rpm for a material, a reground tool runs below its intended speed, and that shows up as rubbing rather than cutting.
The feed
Table feed is feed per tooth times the number of teeth times rpm. If the rpm goes up to keep the surface speed, the table feed has to go up with it, or the chip per tooth falls and the edge rubs. If the feed stays where it was, the tool cuts a thinner chip and wears faster on the flank, which looks exactly like a bad regrind.
The stiffness
A cutter is a cantilever, and its resistance to bending falls very fast as the diameter comes down. A small loss of diameter is a large loss of stiffness, so a depth of cut that worked before the regrind can now push the tool away and leave a taper. Reduce the depth in deep pockets first, and the step-over second.
Two more things are easy to forget. The end teeth are reground too, so a tool that used to plunge may no longer cut to the centre, and the corner is new: a corner radius that was worn is now sharp, which changes the load at entry. And the new edge is bare carbide unless the tool was recoated, so in abrasive work it will wear faster than the edge it replaced.
Regrind, recheck or retire
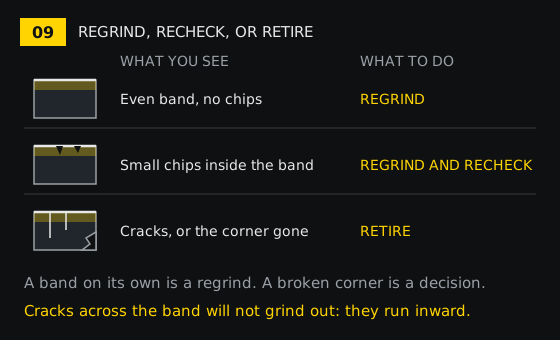
The decision is not about how dull the tool looks. It is about how much material has to come off to restore a sound edge, and how much length is left after that.
- Even band, no chips. Regrind. The land comes off in a light pass and the geometry is unchanged.
- Micro-chips inside the band. Regrind, then check the corner. If the chips are deeper than the land, the corner has to come back further than the rest of the edge.
- A corner broken, or cracks across the band. Retire. A crack that runs inward cannot be ground out from the outside.
- A tool already short. Compare the remaining flute length with the deepest pocket it is asked to cut. When the flute is shorter than the reach, the shank is what is cutting, and no regrind fixes that.
Count the regrinds left, not the ones already done. Each one removes diameter and length, and the tool is finished when the diameter no longer suits the holder, or the length no longer reaches the bottom of the pocket.
What the records in this category specify
This category holds sixty records, fifty-nine of them with a specification table, and those tables use ninety-three different field labels between them. The variety is the first thing to understand: flute, flutes and number of flutes are the same field written three ways, and a filter on one label will miss the others.
Coverage is uneven, and that matters when you compare tools. Fifty-two of the sixty records carry no diameter field at all, and twenty-five carry no flute count. Where the fields are filled, the diameters run from 4 mm to 20 mm in the roughing series and from 4 mm to 14 mm in the radius series, with a single 6 mm size and one face mill at 40 mm to 160 mm. Flute counts are two, three, four, five and single, with ranges such as 2 to 6. Helix angles are quoted as 35° and 45°, and once as 38° to 45°.
Coatings named in the tables include AlTiN, TiAlN, TiSiN, TiCN, TiN, DLC, NACO, AlTiSiN and TiAlSiN, plus uncoated. Substrates are tungsten carbide and tungsten cobalt alloy, with HSS in a handful of records. The workpiece hardness grades quoted run from HRC 45 to HRC 65.
None of that tells you when to change the tool, but it tells you what to compare. A five-flute DLC-coated cutter listed for aluminium, copper and graphite is not the same tool as a two-flute uncoated cutter for the same material, and their wear patterns will not look alike. When you record a band width, record the coating and the flute count with it, or the number is not comparable with anything.
Related reading: chuck and live centre concentricity for the turning equivalent of the index test, and vise jaw parallelism when the taper turns out to be the workpiece moving rather than the tool bending.
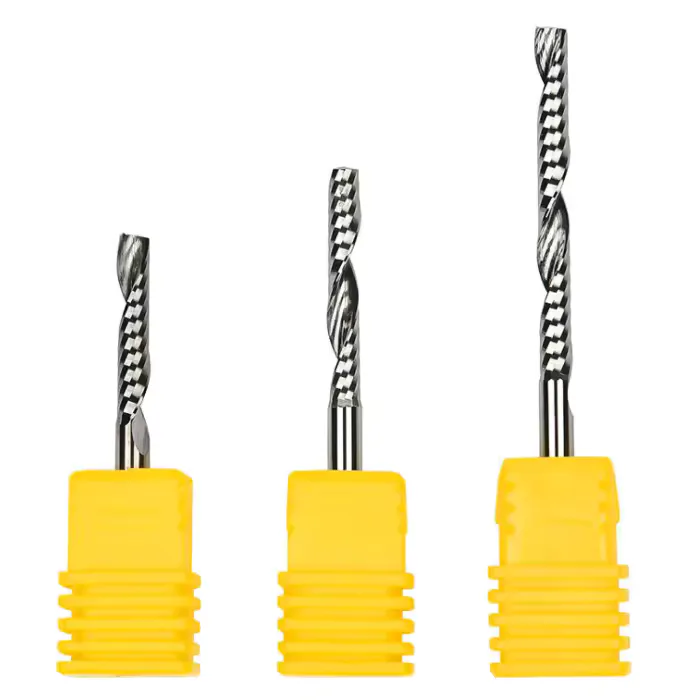
Parts quoted above: the four-flute roughing cutter, the NACO-coated ball nose cutter, the five-flute DLC cutter and the single-flute uncoated cutter. The end mill category lists the rest. Send us the band widths with the material and the depth of cut, and we will tell you which of the four marks you are looking at.